Table of Content
Table of Contents
Ever opened a Word document, tried to fix a single heading, and watched your entire layout fall apart? You aren’t alone. Most document frustration isn’t caused by complicated tools—it happens because word processors treat every space, tab, and paragraph return as an instruction. When those hidden instructions conflict, text jumps, margins misalign, and blank pages suddenly appear out of nowhere.
Formatting isn’t just about making a document look attractive. Good formatting structures your ideas, improves readability, and ensures your document looks identical whether opened on another computer, exported as a PDF, or printed out.
This guide breaks down essential formatting techniques in Microsoft Word step-by-step, skipping unnecessary technical jargon so you can build clean, professional documents with confidence.
1. The Core Control Center: The Home Tab
Almost everything you need for daily document styling sits inside the Home Tab on the main Word ribbon. Understanding how this tab is grouped saves you from hunting through menus.
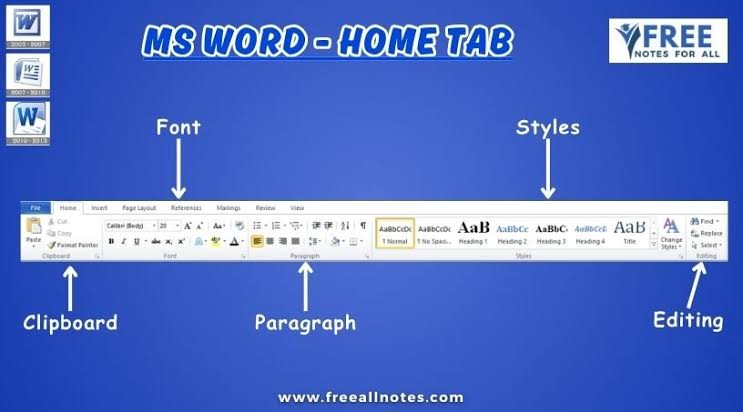
The ribbon separates tools into logical clusters:
- Clipboard: Handles copying, pasting, and copying formatting attributes across text.
- Font: Controls type style, size, weight (bold/italic), highlight, and text colors.
- Paragraph: Manages alignment, line height, indents, bullet points, and spacing.
- Styles: Stores pre-configured structural formats for titles, headings, and body text.
2. Managing Typography and Text Styling
When formatting text, consistency matters far more than decorative variety. Stick to two complementary fonts at most—one clean, highly readable font for body paragraphs (like Calibri, Arial, or Aptos) and an optional distinct font for major headings.
Building a Visual Hierarchy
Readers scan documents before reading them line by line. Establish a clear size structure to guide their eyes naturally through your content:
| Document Element | Recommended Font Size | Font Weight & Style |
| Document Title | 24–28 pt | Bold |
| Heading 1 (Main Sections) | 16–18 pt | Semi-bold / Bold |
| Heading 2 (Subsections) | 13–14 pt | Bold or Italic |
| Body Text | 11–12 pt | Regular |
Using the Format Painter
When you style a piece of text perfectly and want to replicate that look elsewhere, use the Format Painter:
- Highlight the text with the formatting you like.
- Click the Format Painter button (the paintbrush icon) on the Home tab.
- Drag your cursor over the target text to apply the exact same styling instantly.
Pro Tip: Double-click the Format Painter icon to keep it active across multiple selections. Press
Escwhen you finish.
3. Paragraph Spacing, Alignment, and Line Height
One of the biggest mistakes beginners make is hitting the Enter key twice to create space between paragraphs. In Word, doing this creates empty paragraph tags that cause massive spacing headaches later when you edit surrounding text.
Instead, control document flow using actual paragraph settings.
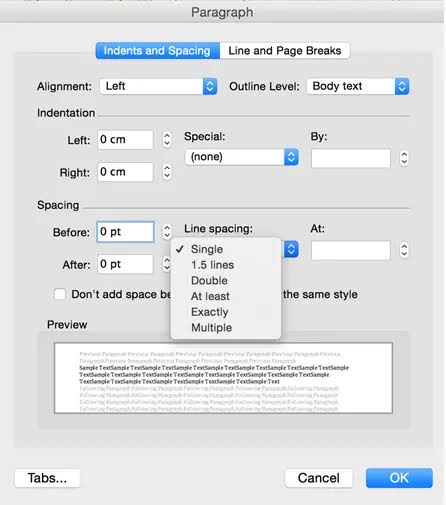
Line Spacing vs. Paragraph Spacing
- Line Spacing: The vertical distance between individual lines within the same paragraph. For standard business and academic writing, 1.15 to 1.5 line spacing offers optimal readability without stretching pages too long.
- Paragraph Spacing: The gap automatically added before or after a paragraph when you hit
Enter.
To adjust these parameters:
- Highlight your text or select the whole document with
Ctrl + A. - Click the small arrow launcher in the bottom corner of the Paragraph section on the Home tab.
- Under Spacing, set
After:to 6 pt or 8 pt. Now every new paragraph separates cleanly with a single press ofEnter.
Text Alignment Choices
- Left-Aligned: Best for body text and standard letters. Creates an even left margin and a natural, readable rhythm.
- Centered: Reserve strictly for cover page titles, short certificates, or formal invitations.
- Right-Aligned: Best for specialized metadata, such as invoice dates or addresses in formal header blocks.
- Justified: Aligns text flush against both left and right margins. Use carefully—without proper hyphenation enabled, justified body text can leave odd gaps (“rivers”) between words.
4. Margins, Indents, and Page Layout
To adjust how your document sits on the physical page, switch over to the Layout tab.
Standard Margins
For formal reports, essays, and workplace documentation, stick to Normal Margins (1 inch / 2.54 cm on all four sides). If you are creating a dense datasheet or fitting content on a single page resume, switch to Narrow Margins (0.5 inches / 1.27 cm).
Proper Page Breaks
If you want a section or new chapter to start on a fresh page, never hold down Enter until text drops to the next screen. If you add text above it later, your lower content will get pushed down unpredictably.
Instead, insert a clean Page Break:
- Place your cursor right before the text you want on the new page.
- Press
Ctrl + Enter(orCmd + Returnon Mac).
5. Harnessing Built-In Styles for Speed
If you only adopt one habits from this guide, make it this one: Use Microsoft Word’s built-in Styles ribbon.
Instead of manually highlighting each heading, selecting bold, and bumping up font size, simply click inside your heading text and select Heading 1 or Heading 2 from the Styles palette on the Home tab.
[Document Title]            --> Style: Title
 └── [Major Chapter]        --> Style: Heading 1
      └── [Sub-topic]       --> Style: Heading 2
Why Styles Change Everything
- Instant Global Changes: Want to change your document headings from blue to dark grey? Right-click the Heading 1 box in the Styles gallery, select Modify, change the color, and every Heading 1 in your 50-page document updates instantly.
- Automated Table of Contents: Word can read your styled headings to build a fully clickable Table of Contents automatically (
References Tab>Table of Contents). - Navigation Pane: Enable the Navigation Pane (
View Tab> checkNavigation Pane) to view your document outline on the left sidebar and jump directly to any section with a click.
Frequently Asked Questions
How do I remove a stubborn blank page at the end of my document?
Blank pages at the end of documents usually happen because hidden empty paragraph tags or page breaks got pushed to the last page. To fix this:
- Go to the Home tab and click the Show/Hide ¶ icon (or press
Ctrl + Shift + 8). - This reveals all hidden symbols, paragraph returns, and page breaks.
- Scroll to the end, highlight the unnecessary
¶symbols orPage Breaktags, and hitBackspaceorDelete.
Why does text I paste from the web look messy, and how do I fix it?
When you copy text from a website or document, Word imports the original font, colors, background styling, and hyperlinking by default.
To paste clean text:
- Use the shortcut
Ctrl + Shift + V(Keep Text Only). - Alternatively, right-click where you want to paste and select the icon with a plain letter A (Keep Text Only).
What is the shortcut to clear all formatting from selected text?
If text has messy or mixed formatting, highlight the problem text and press Ctrl + Spacebar. This strips away custom font styles, sizes, colors, and bolding, resetting the text back to your document’s default Normal style.
What is the difference between a soft return and a hard return?
- Hard Return (
Enter): Creates a completely new paragraph. Word applies paragraph spacing after it and treats it as a separate block of text. - Soft Return (
Shift + Enter): Inserts a line break within the same paragraph. It drops your text down to the next line without adding extra paragraph spacing or starting a new bullet point.